Adopt prodockit
Use these instructions to adopt Prodockit into a new or existing Zensical site. The Clean path creates and tests a new Zensical site first. The Update path adds Prodockit to an existing site, or updates a site that already uses it, while keeping your content and reviewing changes to its configuration.
Both paths use pdk adopt to align the software and add your selected features.
Unlike the template-site route, adoption does not replace your project with
prodockit-template. Section 4.1 guides you through the stages for your path.
Build and verify the site
Start with Stage 1, then follow the route shown in Figure 4.1: for a clean installation, complete Stage 2 and Stage 3a; for an existing site, skip those stages and continue with Stage 3b. Both paths join at Stage 4 to configure Prodockit, verify the website and add any downloadable outputs you need.
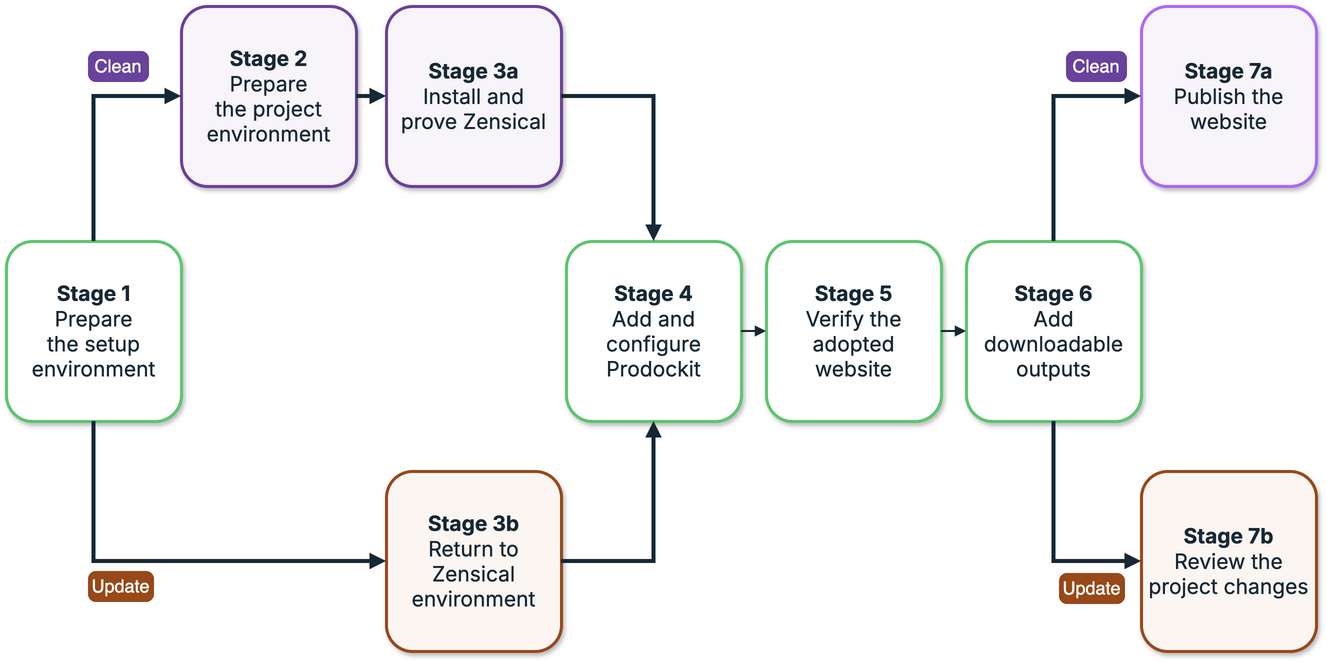
1. Build or update a site
Use the badges beside stage and step titles to follow your route:
- Clean: only for a new site in an empty directory.
- Update: only for an existing Zensical site, with or without Prodockit.
- Optional: skip when already completed or not needed.
- Privileged: installing host software needs administrator or
sudoaccess. - Go to: click to jump to another section.
Steps without a path badge apply to both routes. The words identify the path as well as the colours. Keep your existing site's content and configuration; do not copy new-site examples over them.
After Stage 6, the routes separate again. Stage 7a helps a new project save its files and publish through GitHub or GitLab Pages. Stage 7b helps an existing project review Adopt's changes and follow its own release process. You can stop after local testing if you are not ready to commit or publish.
Stage 1 — Prepare the setup environment Privileged
Python 3.14 must be installed before either a clean installation or an update. An existing Zensical site may use an older Python version; installing or updating Prodockit does not upgrade Python itself.
If Python 3.14 is not already installed, complete section 3.1 in the parent directory that holds your repositories. It also prepares the shared setup environment:
Open section 3.1 to prepare your environment
Once you have Python 3.14 installed, choose the route that matches whether you are creating a new site or updating an existing one:
- For a Clean install, continue: Go to Stage 2.
- For an Update install, skip ahead: Go to Stage 3b.
Stage 2 — Prepare the project environment Clean
Create the new site directory and its own Python environment. For an existing Zensical site, skip to Stage 3b and use its existing directory and environment.
-
Prepare the empty project directory
Leave the setup environment, then create and enter your new site's folder. Change
~/reposandprodockit-projectif you chose different names. Skipdeactivateif no environment is active, andmkdirif the intended folder already exists and is empty.Run each line in turn. If
cdfails, stop and correct the path before continuing. -
Create and activate the project environment
Create a Python 3.14 environment in
.venv, then activate it so subsequent commands use this site's packages rather than another project's.The policy command allows activation scripts for your Windows account.
-
Verify the project environment
Check your current directory, Python version and active environment before installing Zensical:
The results should show your project folder, Python 3.14 and that folder's
.venv—not~/repos/.venv. If they do not, correct the directory and activate the project's environment before continuing.
Stage 3a — Install and prove Zensical Clean
If you already have a Zensical site, skip this stage and continue with Stage 3b, even if its current build fails: Adopt may repair its software dependencies.
Install Zensical, create its starter site, and prove that the unmodified site builds and previews successfully before Prodockit is introduced.
-
Install Zensical
Install the latest Zensical into your active project environment using the command for your platform. See the official installation guide for details.
-
Create the Zensical site
Create the starter site in your empty project directory. The dot means “here”—do not run this in an existing site.
See the project structure or Zensical's Create your site guide for details.
-
Build the plain Zensical site
Build the website from scratch and check for errors or warnings. Continue only when the build succeeds.
-
Preview the plain Zensical site
Start a local preview with
zensical serve:Open the address printed in the terminal and check that the site appears. Press
Ctrl+Cto stop the preview.
Now that Zensical is set up, continue with installing Prodockit: Go to Stage 4
Stage 3b — Return to Zensical environment Update
Use this route when you already have a Zensical site, even if its environment needs rebuilding or its current build fails. If you completed Stage 3a, skip this stage and continue with Stage 4.
Protect your existing site before continuing
Create a new Git branch or make a separate clone of your existing Zensical site, and carry out the following steps there. Save open files and protect uncommitted work first: a new branch is not a backup, and a clone does not include uncommitted changes from your current folder.
The pdk adopt command changes several existing files, including the
site's configuration, software version settings and managed stylesheets
and scripts. Working separately lets you review and test these changes
before merging them into your usual branch. If your site does not use Git,
make a backup copy of the project folder before continuing.
See Section 3.2.3 for the template site's files and Section 4.1.9 for details of which files Adopt changes and how to review them.
-
Enter the project root directory
Leave the active environment, then enter the existing site's root directory—the folder containing its Zensical configuration. Use your own site's path if it differs from the example. Skip
deactivateif no environment is active. Do not create another project folder or runzensical new ..If
cdfails, stop and correct the path before continuing. -
Create a virtual environment Optional
Skip this step if the site already has a working Python 3.14 environment. These instructions use
.venvas the environment folder name. If yours has another name, use that name in the activation commands in step 3; do not create a second environment just to match the guide.If no environment exists, create one inside the project directory using Python 3.14 from the preparation stage. This keeps the site's packages separate from other projects. For a damaged or older environment, follow environment recovery instead.
-
Activate the virtual environment
Activate the site's environment so the following installation commands use its Python and packages. Replace
.venvif your environment has another name.The execution-policy command allows PowerShell to run the environment's activation script; otherwise Windows may block it. It affects your account, not other users.
Now that your existing site's environment is active, continue with installing Prodockit. Adopt will align its software in the next stage: Go to Stage 4
Stage 4 — Add and configure Prodockit
Install Prodockit, choose the features you need, then check the completed setup.
Why are we not installing and configuring by hand?
Adopt aligns the Python packages, managed assets and project configuration,
while preserving author-owned content and settings. It does not install the
PDF generator or its host prerequisites. The first pdk pdf build prepares
only the verified project-local runtimes the completed document actually
uses. Pandoc is shared by citations and PDF processing, so the instructions
below prepare it separately without installing the rest of the PDF toolchain.
-
Install Prodockit
Install or update Prodockit in the active project environment. This adds the
pdkcommand; the next steps use it to configure your site.Adopt may upgrade or downgrade software
In the following steps,
pdk adoptmay upgrade or downgrade software in your project environment to the versions supported by your installed Prodockit release. Newer versions have previously introduced changes that affected website appearance or broke parts of the build, so the newest version is not always the supported choice. Review Adopt's plan before approving changes; it shows which versions will be installed. -
Choose optional renderers
Choose whether to include Mermaid diagrams and mathematical notation:
Both default to No for a new site. Existing installations or saved choices may already enable them; check before accepting.
Adopt records the selection without installing a renderer. The first
pdk pdfprepares the selected project-local cache. Mermaid needs only Python; PDF mathematics also needs Node.js onPATH, installed separately, but not npm. The optional installation steps in Stage 6 prepare those requirements when this machine will generate PDFs locally. -
Adopt the Zensical site
Adopt checks your site, installs or updates the software it needs, and adds Prodockit's settings and shared files while preserving your content. First preview its plan, then apply the changes you approve. The coloured messages help you see what is ready, what will change and what needs your attention, as shown in Figure 4.2.
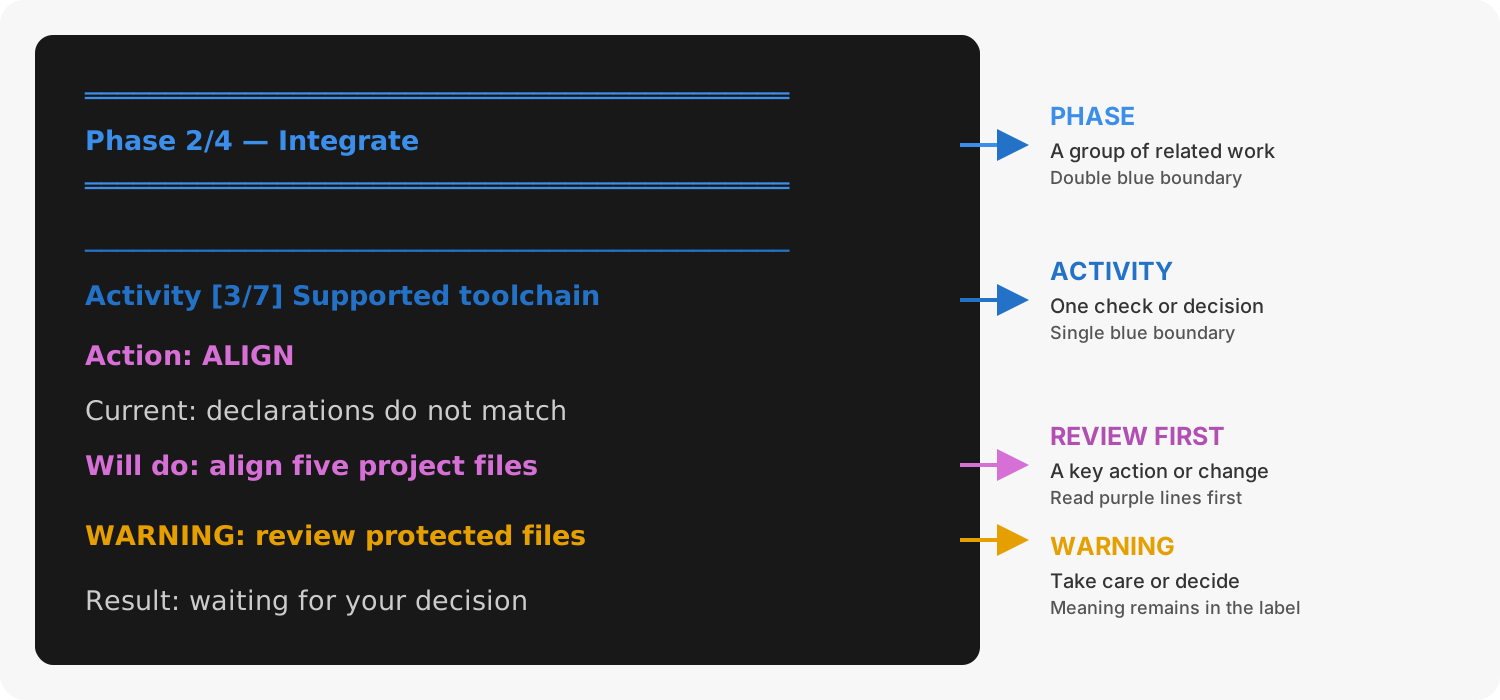
2. Reading the coloured Adopt messages
Preview the proposed changes without installing anything:
Apply the plan, approving or skipping each group of changes:
Answer the final questions about your site and repository. You can defer unknown details and optional repository setup until you are ready to publish. Stage 7a explains how to return to these questions. Adopt asks before installing Git tools, connecting or creating a repository; it never commits, pushes or publishes your files.
Accept the final diagnostic check and follow any correction instructions. The project structure guide explains the files added by Adopt.
If installation is interrupted, keep your files, reactivate the environment and rerun
pdk adopt --apply. Follow any cleanup or restart instructions first; see Recover a failed installation.If a TOML or YAML syntax error is reported, correct the indicated file and line, then rerun the same command. Completed activities are retained and rechecked; do not delete your project or start again.
-
Refresh the project environment
Reactivate the environment before running diagnostics or builds to load any paths Adopt added. Use the activation path it prints if yours has another name.
Adopt displays this highlighted banner, using your project's actual path:
==============================================================================
RESTART YOUR TERMINAL BEFORE CHECKING THE PROJECT
Fully close Windows Terminal or VS Code, then reopen it in this project.
  Project: C:\Users\your-name\repos\prodockit-project
  & 'C:\Users\your-name\repos\prodockit-project.venv\Scripts\Activate.ps1'
==============================================================================
Close and reopen the terminal, then return to your project directory before running the commands below. The policy command allows activation scripts for your account.
-
Prepare project-local Pandoc Optional
Complete this step when the adopted document uses Prodockit citations or a bibliography, or when you intend to generate PDFs locally. Otherwise skip it; the starter adopted site has no citation file and its website does not need Pandoc.
Install the verified Pandoc release in this project's ignored cache:
Prodockit downloads, verifies and selects Pandoc; do not install it with Homebrew, Winget or apt, and do not rely on a system
pandoccommand fromPATH.This preparation is supported on Windows ARM64 even though local PDF generation is not. On that platform, use Pandoc for the website build and let the GitLab pipeline generate the PDFs.
-
Diagnose the adopted site
Check the environment, installed tools and project setup without changing files. This is also a useful tool to run whenever you have problems: it checks for common errors and suggests how to correct them.
Resolve every
FAILbefore continuing. Warnings about deferred repository setup can wait until Stage 7a. For help, see Correct diagnostic findings.
Stage 5 — Verify the adopted website
Check a new site's example or your existing pages to confirm that Prodockit is working with your content.
-
Add and verify Prodockit content
For a new site, put this example in
docs/index.md. For an existing site, keep your content and your site will adopt the styles used on this website. The example below is for the Clean path; do not replace an existing homepage.Custom styles can override Prodockit
Adopt preserves your custom styles. Your
extra.cssloads after Prodockit'spdk.css, so its rules may override the Prodockit styles and change how features appear. You may need to adjust or remove conflicting custom rules. See stylesheet precedence for the loading order and how the styles work together.# My first document The detail is in \ref{results}. ## Method Describe what you did here. ## Results {: #results } Describe what you found here.In the new-site example, Prodockit should number the headings and turn
\ref{results}into a link to the Results section. For an existing site, check the features you already use instead. -
Build and preview the adopted website
Build the site, then start the preview only if the build succeeds:
Open the displayed address and check the numbered headings and reference link. For an existing site, also check its pages, styling and navigation. Press
Ctrl+Cto stop the preview before continuing.
Stage 6 — Add downloadable outputs Optional
Create downloadable PDFs of your document and its source. For an existing site, keep working download links and use the output filenames printed by the commands. The whole stage is optional. If you do not need downloads, skip to the route choices at the end of this stage.
Local downloads and published downloads are different
These steps test downloads locally. The stock website workflow does not regenerate PDFs; configure publishing to keep online downloads up to date.
-
Install PDF host software
Complete this step only when this machine will generate PDFs locally. Skip it for website-only work and on Windows ARM64, where the GitLab pipeline generates the PDFs.
A PDF containing mathematics needs both Pango and Node.js on macOS or Ubuntu; the supported Windows x64 PDF runtime needs only Node.js:
Close and reopen PowerShell, return to the project, and reactivate its virtual environment.
For a PDF without mathematics, omit
nodeornodejs. Verify Node when it is needed:No npm packages, browser or MSYS2 installation is required.
-
Prepare PDF components
With the host software installed, download, verify and cache every configured PDF component:
Skip this step on Windows ARM64. If you prefer lazy preparation, an ordinary
pdk pdfprepares only the components used by the document on its first local PDF build. -
Generate the rendered PDF
Build the website, then generate its PDF. Run
pdk pdfonly if the build succeeds.Open the output, normally
docs/site_documentation.pdf, and check its layout and links.See PDF documentation for more detailed guidance.
-
Generate the source bundle
Create a separate PDF containing the Markdown and configuration for review or submission. Skip this step if you do not need to share the source.
The output is normally
docs/source_bundle.pdf.See Bundling source into a PDF for more detailed guidance.
-
Add both downloads to the site
Add buttons for the files you generated to
docs/index.md. Omit the Source button if you skipped the source bundle, and use your actual output filenames. Keep existing download links if they already work:<div style="float: right; display: flex; gap: 15px; margin-left: 15px;" class="web-only" markdown="1"> [:material-archive: Source](source_bundle.pdf){ .md-button target="_blank" } [:material-file-pdf-box: PDF](site_documentation.pdf){ .md-button target="_blank" } </div>Rebuild to copy the PDFs into the website, then preview it if the build succeeds:
Test the buttons you added in the browser. After changing the content, regenerate the PDFs and rebuild the website to keep the downloads current. Press
Ctrl+Cto stop the preview.
Choose the next stage for your site:
- For a Clean install: Go to Stage 7a.
- For an Update install: Go to Stage 7b.
Stage 7a — Publish the website Clean
This stage publishes your working local site on GitHub Pages or GitLab Pages.
Stay in the project directory with its environment active. If the site is already published, keep its existing workflow and use its normal review process.
If you deferred repository setup, run pdk adopt --apply again and accept its
optional site and repository questions before continuing. You need a repository
and an origin connection before the commands below can upload your files.
The steps below enable Pages, check the files you will share, save and upload your changes, and confirm that the website is published. We provide terminal commands, but you can review the differences between files in your preferred development environment, such as Visual Studio Code. Its Source Control view lets you inspect changes side by side before committing. Using an editor for this review is optional; the commands below work without one.
Check what you are sharing
A public repository exposes its committed files, and a public Pages site exposes the generated website. Do not upload passwords, tokens or private material. Do not make a repository public just to work around a Pages error.
-
Enable repo for Pages
Use your host's tab. Skip settings that are already correct.
- Open your repository on GitHub.
- Open Settings > Pages. If Settings is unavailable, ask a repository administrator to configure Pages.
- Under Build and deployment, set Source to GitHub Actions. Do not choose Deploy from a branch. GitHub may suggest a new workflow; skip that suggestion when your repository has one already.
- Return to the repository's Code tab and open
.github/workflows/docs.yml, or the existing workflow that builds your website. Keep its triggers and deployment settings. - If Adopt created
pdk.ymlin the repository root, follow Merge the build instructions to bring its proposed build commands into the existing workflow. Do not add a second publishing workflow. - If there is no website workflow, follow GitHub Pages setup before continuing. The later steps in this stage check the build, commit the files, and start the deployment.
- Sign in to GitLab and open the project that will publish your site.
- In the project sidebar, open Settings > General, expand Visibility, project features, permissions, and check that Pages is on. If you turn it on, select Save changes. Ask the project owner if you cannot change this setting; do not make the repository public.
- Return to the project repository and open
.gitlab-ci.ymlfrom its top-level file list, if the file exists. - Look for a job named
pagesor one with apages:setting. Check that it publishes the builtpublic/directory. Keep the existing job, branch rules, and project-specific settings. - If Adopt created
.gitlab-pdk.yml, follow Merge the build instructions to bring its proposed build commands into.gitlab-ci.yml. Do not replace the whole file or add a second Pages job. - If
.gitlab-ci.ymlis missing or has no Pages job, follow the GitLab publishing workflow setup before continuing, then check the file again. Adopt does not create an active GitLab pipeline.
-
Check the site and files
Check the setup and build the site. Run each command separately and stop if a check fails:
List every changed and new file so you can check what will be included in the commit and avoid uploading generated or private files:
Include source, configuration and the publishing workflow—not
.venv, generated website output, caches, backups or private files. -
Save and upload the changes
Select the site's source, configuration and publishing workflow files reviewed in step 2, then review and commit the changes, running one command at a time. Press
qto leave the diff viewer; stop if anything should not be shared. If your repository requires a pull or merge request, use that process instead.Upload the commit to start the publishing workflow. Use your publishing branch if it is not
main:If there is nothing new to commit or push, check the latest deployment instead.
-
Open the published website
Wait for a successful deployment, then open the published site:
- Open the repository's Actions tab.
- Open the documentation run for your latest commit and wait for success.
- Return to the repository's front page and click the configuration cog beside About.
- Tick Use your GitHub Pages website and save the change.
- Click the website link now shown in the About panel to open your site.
- Open your project on GitLab, then select Build > Pipelines in the project sidebar.
- Open the pipeline for the commit you just pushed.
- Check that its Pages job completed successfully. If it failed, open the job log and resolve the reported error before continuing.
- Select Deploy > Pages in the project sidebar to find the published website address.
- Open that address in a new browser tab and check the site.
Check the pages, navigation and any diagrams or maths. If publishing fails, use Troubleshooting before retrying.
If the published address differs from your configuration, update it using the actual address below, then repeat steps 2 and 3:
For automated PDF and source downloads, follow Publish a document.
Congratulations — your Prodockit website is now published! Go to section 4.2 to learn which files are yours to manage and how to keep your site up to date.
Stage 7b — Review the project changes Update
If your site already uses Git, review the changed and new files before committing through your normal workflow. If your existing site has no repository, still review the files below, then use Stage 7a when you are ready to publish.
-
Review the Adopt changes
Before committing, review the files added or updated by
pdk adopt. Check that your content and custom settings have been preserved. Only the activities you approve are applied; not every project needs every change below.Paths are relative to your project root. The
docs/examples use the default documentation directory; asset paths follow your site's configured locations.Table Table 4.1 lists files that may also be used by Zensical, your own customisations or other tools. Review them for changes that could affect the rest of your project.
1. Shared project files to review after adoption
File or group Overall change How existing files are handled zensical.tomlAdd or align authoring extensions and website stylesheet/script ordering. Save site and repository details you confirm. Edit the existing TOML with TOML Kit, then validate with tomllibbefore saving. Preserve unrelated settings and comments; PDF-only settings are migrated bypdk pdfon first use. New, unrecognised template settings are added as commented suggestions, subject to Adopt's exclusions and review ledger.Existing YAML site configuration, such as mkdocs.ymlApply the supported authoring and asset settings when the project uses YAML instead of TOML. Update supported settings in the existing text and validate the result before saving. Unsupported structures stop the update rather than being guessed. The template-settings ledger applies to TOML, not YAML. requirements.txt,requirements/docs.txtordocs/requirements.txtRecord the Python packages and supported versions needed to reproduce the site. Choose the first existing file in this order, or create requirements.txt. Update recognised package declarations and append missing ones; retain unrelated dependencies.pdf-requirements.txtRecord Python packages used only by PDF generation. pdk pdfcreates or migrates this file on first use, moves legacy WeasyPrint out of base requirements, then installs and validates the PDF packages. Adopt leaves it alone.Other recognised version declarations, including pyproject.tomlwhen presentAlign supported package versions already declared in the project. Use pdk pins, the command that aligns recorded software versions, to change recognised version values, not replace the whole file. Build automation (CI) files are excluded from this pass and handled separately below..python-versionRecord the supported Python version. Replace the file's contents with the release's supported Python version. This does not replace the Python interpreter itself. .gitignoreExclude environments, generated files, renderer dependencies and Adopt backups. Append missing ignore rules without removing existing rules. Ignore rules do not untrack files already committed to Git. docs/stylesheets/extra.cssProvide a place for website customisations. Create the starter file only when missing; preserve existing contents. pdk pdfcreates a missing PDF-onlyprint.csson first use.docs/javascripts/extra.jsProvide a place for your custom JavaScript. Create an empty file if missing. Preserve custom contents. If it exactly matches the recognised old stock script, allowing for line endings, clear it after installing that behaviour in pdk.js.Configured citation-style file ( .csl)Supply the supported citation style when needed. Preserve an existing file. Install a missing recognised standard style from its trusted source or validated cache. A missing custom style requires attention rather than substitution. .github/workflows/docs.ymlAdd the Prodockit dependency installation and optional MathJax restoration to a stock website build. Replace only when the entire file's SHA-256 fingerprint matches the trusted Zensical baseline. Leave an already aligned file unchanged. Otherwise, preserve your workflow and place a proposed replacement at ./pdk.ymlin the project root, creating it only if absent. Manually edit.github/workflows/docs.ymlto merge the required changes; the proposal is not activated automatically. Follow Step 2 — Merge the build instructions..gitlab-ci.ymlKeep the existing GitLab build and publishing instructions. Preserve your file unchanged: no trusted stock GitLab baseline is bundled. Place proposed replacement instructions at ./.gitlab-pdk.ymlin the project root, creating it only if absent. Manually edit.gitlab-ci.ymlto merge the required changes; the proposal is not activated automatically. Follow Step 2 — Merge the build instructions.Table Table 4.2 lists Prodockit's own settings, managed assets and renderer setup, or its proposed build instructions. The renderer software itself is third-party software; these are the project-local files managed for Prodockit.
2. Prodockit-specific files to review after adoption
File or group Overall change How existing files are handled .prodockit-toolchain.tomlRecord the release's supported software specification. Replace the generated manifest when it differs from the installed release. .prodockit-components.tomlSave the selected optional components. Write a generated manifest containing the selected component choices; do not use this file for unrelated custom settings. .prodockit-adopt.tomlRecord which template settings have already been processed. Read the review ledger, skip previously processed settings, then save the updated ledger after valid configuration has been written. Deleting it allows settings to be reviewed again on a later run. docs/stylesheets/pdk.css,docs/stylesheets/pdk-pdf.css,docs/javascripts/pdk.jsInstall the managed styles and behaviour supplied by Prodockit. Replace these managed files with the installed release's copies when the activity runs. Put your customisations in the user-managed files in the first table, not here. .prodockit/cache/pdf/Cache verified PDF-only Pandoc, fonts, Mermaid and MathJax runtimes on demand. pdk pdfmanages this ignored project-local cache; usepdk pdf --prepare COMPONENTto prepare a component explicitly. Website maths remains configured separately according to Zensical's MathJax instructions.pdk.ymlPropose GitHub build instructions for manual merging. Create at the project root only when an existing GitHub workflow is not recognised and no proposal exists. Never overwrite an existing proposal; the root-level file is not an active GitHub workflow. .gitlab-pdk.ymlPropose GitLab build instructions for manual merging. Create only when .gitlab-ci.ymlexists and no proposal is present. Never overwrite an existing proposal. Its hidden example job does not run by itself.Adopt can also change installed packages in the active environment (usually
.venv/). Separately approved repository setup can initialise.git/and update local Git identity and remote settings. These are local installation changes, not source files to add to your commit.Do not commit local environments, caches, backups or private files.
-
Merge the build instructions
The
pdk adoptcommand only replaces a GitHub workflow when its SHA-256 hash matches a trusted Zensical baseline. Otherwise, it preserves the existing workflow and creates a separate proposal if one is not already present. GitLab workflows are always preserved, with proposed changes supplied separately.Merge the relevant instructions from
./pdk.ymlinto./.github/workflows/docs.yml.The proposal stays in the repository root, outside
.github/workflows/, so GitHub cannot run it automatically before you review and merge it.Merge the relevant instructions from
./.gitlab-pdk.ymlinto./.gitlab-ci.yml.This is a manual merge, not a file replacement. Bring across the required dependency installation and build commands while keeping your existing triggers, permissions, secrets and publishing settings. Avoid duplicate jobs or commands. The proposals cover the website build; PDF publishing needs additional setup.
The separate files do not run automatically. If neither exists, skip this step.
-
Follow your project's release process
On the branch prepared in Stage 3b, follow your usual process to review and commit all the project changes made by
pdk adopt, including any build instructions merged above, then push the branch. Use your normal pull or merge request, testing and release process before publishing the updated site. Keep local environments, caches and private files out of the commit.
Congratulations — your Prodockit website is now published! Go to section 4.2 to learn which files are yours to manage and how to keep your site up to date.
Understand the completed project
This section explains which parts of the adopted site Prodockit maintains and how to keep the completed project aligned after installation.
Know what becomes yours
Whether you started with a new or existing Zensical site, Adopt adds and aligns the selected Prodockit components. The adopted project tree shows the principal managed and user-managed files together.
Prodockit maintains its standard stylesheets, JavaScript, supported-toolchain
record, and saved component choices. Your Markdown, images, bibliography,
site identity, navigation, and the contents of extra.css, print.css, and
extra.js remain yours. Generated output and .venv stay local and can be
recreated.
Adoption does not create or remove a template relationship. For a new plain
site, pdk template-sync does not apply unless that relationship is established
later. For an existing template-derived site, retain its template metadata and
continue using Template Sync for template updates,
followed by Adopt and diagnostics.
Keep the project current
In your project directory, with its environment active, update Prodockit:
Check the project for problems before applying changes:
Then review and approve the software and configuration changes proposed by Adopt:
Follow any environment-refresh instructions it prints and resolve any remaining problems. Rebuild and inspect your website and downloads, then review the changed files before committing.
Where to go next
Choose the route that matches the result:
- If setup has not completed or any check fails, use Troubleshooting.
- If setup has completed and
pdk diagpasses, continue with Publish a document.