Build a template site
prodockit bootstrap prepares a machine and creates or
resumes a project based on prodockit-template. Use
Upgrade existing site when an established Zensical document
needs Prodockit without the template, or Build site
manually when you want to perform and verify every setup
task yourself.
This is not a general Zensical installer; it is the route for building from prodockit-template.
This guide organises what you do into documentation stages and steps. Bootstrap reports its own work as phases and activities, allowing each activity to be checked, repaired, and checked again. The Bootstrap command reference lists all 20 activities.
Start with prodockit-template
The prodockit-template project (GitHub repository) is a ready-made
Zensical project for coursework, assignments, and professional reports. Its
central promise is one source, two outputs: write the report as Markdown
under docs/, then build both a browsable website and a single PDF from the
same pages and navigation.
Use the template when you want the publishing structure supplied for you. It does not prescribe the subject or wording of the report, and it does not turn your project into a live copy of the template.
The template is maintained on GitHub. Bootstrap uses that source when setting up projects on GitHub.com or GitLab.com.
The template has a larger project structure because it already connects authoring, website and PDF rendering, testing, and deployment. See the template-site directory tree in section 3.2, alongside the clean Zensical and adopted-site structures.
Replace the sample pages and headings with your document. Keep the publishing and toolchain files until you have a specific reason to customise them; Template Sync can then maintain shared infrastructure without replacing your content.
Install with bootstrap
The seven stages below prepare the setup environment, assess the proposed work, apply it, and verify the completed project. If you open a new terminal, reactivate and verify the appropriate environment as described in section 3.1. Each command is safe to repeat: Bootstrap checks before it changes anything, and a completed activity is left alone.
If Bootstrap reports that it is running outside a virtual environment, it stops before later activities. Run the recovery commands it displays, then start Bootstrap from that environment in the same setup directory. Answering "yes" or activating an environment in another terminal cannot change the Python process already running. The new run checks the prerequisite again; the stopped run does not record it as completed.
Stage 1 — Prepare the setup environment
Create the shared setup environment, install Prodockit into it, and verify that the shell selects the command from that environment.
-
Prepare Python and the setup environment
Complete section 3.1 in the parent directory that holds your repositories:
Open section 3.1 to prepare your environment
Return here with that setup environment active. Bootstrap later creates a separate build environment inside the cloned project.
-
Install Prodockit into the active environment
With the setup
.venvactivated, upgrade pip and install Prodockit using the commands for your operating system. Thepiporpip3command must belong to that active environment:If pip or pip3 does not work
If
pipdoes not work, trypip3; ifpip3does not work, trypip. Keep the intended virtual environment active and check that the alternative command belongs to it before installing packages. -
Confirm the Prodockit version and command path
Confirm both the installed version and the command selected by the shell:
The command path must be inside the setup
.venv. An older Prodockit command from another Python can otherwise shadow the package just installed whilepipstill reports success. Do not run the completepdk diaghere: it is a project-scoped command, so a setup directory which holds project repositories is refused before diagnostics start. Stage 7 runs it from the completed project and its separate environment.
Stage 2 — Assess and preview
Record the project choices, inspect the commands Bootstrap proposes, and resolve anything that needs attention before allowing changes.
-
Record the host and project choices
This asks for the Git host, your identity, and the project location, then saves the answers in
.pdkboot.tomlin the setup directory. It stops after configuration, including when you rerun it to change earlier answers. Use the dry run in the next step to assess the configured work.Choose GitHub.com or GitLab.com. Bootstrap uses the public GitHub template for either host. If you have already been given a repository, supply its SSH URL when Bootstrap asks for the source; the existing repository is cloned without replacing its history. Bootstrap asks for the namespace and repository name.
pdk bootis the short form ofprodockit bootstrap. Use--config PATHwhen the saved configuration is deliberately elsewhere. The command reference explains the saved fields and scripted use. -
Review the proposed commands
The dry run shows every proposed command and every action it would ask you to complete, without running or changing anything. Review the complete plan before allowing Bootstrap to work on the machine.
-
Resolve warnings before applying
Read each warning, decision, and proposed change before continuing. Do not apply the plan until you understand any manual action or potentially disruptive software change it identifies.
Figure 5.1 is a short visual guide to the dry-run output. Use section 28.1, Scan phases and activities for the complete explanation of its phases, activities, actions, warnings, and decisions:
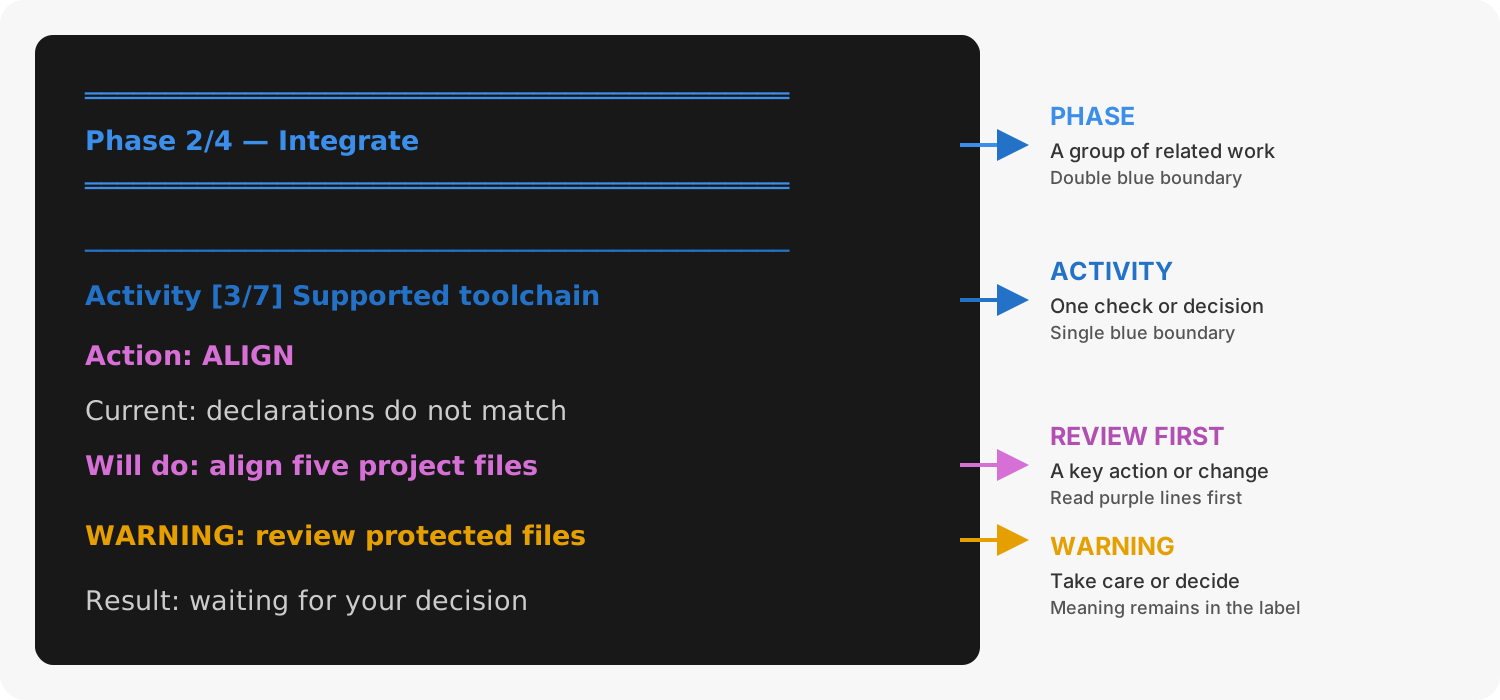
1. Reading Bootstrap's dry-run output
Stage 3 — Apply and confirm
Apply the reviewed plan, complete the actions that require a browser, and ask Bootstrap to confirm the finished installation.
-
Apply the reviewed plan
It asks before each activity and shows the commands first.
You can stop an applied run between activities. Run the same command later to reassess the installation and continue with the remaining work.
-
Complete the browser actions
Two Bootstrap activities need a browser: uploading your SSH key and creating the project on the host. Bootstrap asks you to type
yeswhen each action is complete.Complete the manual step before confirming
Complete the browser action described on screen before answering its prompt. Type
yesonly after checking that the action succeeded; the confirmation allows Bootstrap to continue but cannot perform the action for you. -
Confirm every Bootstrap activity
Every activity should report
ok, and the last one names the address where the site is published. If an activity still needs work, its line says what and why; running--applyagain works only on outstanding activities.
Stage 4 — Enter the project
Move from the shared setup environment into the project environment and account for a required Windows restart. These steps apply to every project, including a website-only project that does not use PDF output.
-
Restart the terminal on Windows if instructed
Windows only — skip this step on macOS and Linux
Windows installers change settings inherited when the terminal application starts. A new tab or reactivating the virtual environment can retain the old settings, so complete this step before checking the project.
Fully close Windows Terminal or VS Code, then reopen PowerShell. Bootstrap displays this amber message when a restart is required:
============================================================
RESTART YOUR TERMINAL — WINDOWS SETTINGS HAVE CHANGED
============================================================
Fully close Windows Terminal or VS Code, then reopen it.
Open PowerShell in your project directory:
C:\path\to\your-project
Set-ExecutionPolicy -Scope CurrentUser -ExecutionPolicy RemoteSigned
..venv\Scripts\Activate.ps1
pdk diag
============================================================
The project path is replaced with your actual path. Continue with the next step in the newly opened PowerShell.
-
Enter and activate the project
Leave the setup environment, enter the project directory named by Bootstrap, and activate the project environment created by Bootstrap. Changing directory while the prompt already says
(.venv)does not switch environments.In the fresh PowerShell opened in the previous step, run the following commands; there is no active environment to deactivate:
-
Confirm the project environment
The printed Python prefix must end in your project's
.venv, not the parent repositories directory's.venv. This check applies to new and pre-existing repositories on every host.
Stage 5 — Install PDF host software Privileged Optional
Complete this stage only when this machine will generate PDFs and its host
software is missing. Installing Pango or Node.js needs administrator or sudo
access. Skip this stage for website-only work and on Windows ARM64. The GitLab build
can generate both PDFs.
-
Install Pango and Node.js
Pango is needed for local PDFs on macOS and Ubuntu; Node.js is needed only when the PDF contains MathJax notation. Mermaid needs no Node.js. If the software is already present, verify it and skip installation. A website-only project needs neither prerequisite.
This step is for Windows x64 only. Do not run it on Windows ARM64; use the GitLab build for PDF generation instead. The supported Windows x64 path uses a verified project-local WeasyPrint runtime and needs no Pango or MSYS2 installation. Install Node.js only for PDF mathematics:
Close and reopen PowerShell after installation, return to the project, reactivate its virtual environment, and verify with
node --version.For a PDF without mathematics, omit
nodeornodejsfrom the installation command and verification. No npm packages, browser or MSYS2 are required.
Stage 6 — Build the PDF downloads Optional
Complete this stage only when you need local PDF output and have any required
host software. Skip it for website-only work and on Windows ARM64; use a
supported CI runner for PDF generation instead. Build the source bundle last;
Stage 7's zensical serve refreshes the site with both downloads.
-
Build the website for PDF rendering
Build a clean website and treat every warning as an error:
Stop and correct any failure before continuing.
pdk pdfconsumes this completed Zensical build; it does not replace the website build. -
Build the rendered document PDF
Generate the rendered document from the completed website. On the first run,
pdk pdfautomatically installs the project's committed PDF-only Python requirements and prepares verified project-local Pandoc and font caches. It also prepares Mermaid or MathJax only if the built content uses them (or their PDF configuration requests preloading). Later runs reuse healthy caches. This automatic preparation does not install the host Pango or Node.js software covered in Stage 5.The rendered PDF is written to
docs/site_documentation.pdf. -
Build the source bundle
Generate the separate PDF containing the project's source files:
Check
docs/source_bundle.pdf. When Stage 7 startszensical serve, it builds the current site and makes both PDF download buttons available for review.
Stage 7 — Verify the project
Check the active project environment and its configuration, then inspect the website and any optional PDF downloads that were built.
-
Run project diagnostics
Bootstrap leaves every PDF runtime to
pdk pdf, which prepares verified project-local caches on first use. Mermaid and maths are optional components and are not selected by default in the template's.prodockit-components.toml; content that uses them can still trigger preparation. Bootstrap does not block completion on optional PDF system prerequisites; the first applicable PDF build checks them.The
Projectline must name the clone rather than its parent setup directory. Add--verbosefor resolved evidence or--jsonwhen attaching the report to a support request. If Diagnostics reports a failure, stop and resolve it before continuing; do not apply an update from the wrong environment. -
Serve and verify the project
Start the local website:
Open the address printed by Zensical in a browser and check the website. For the standard template, also select both download buttons and confirm that the rendered document PDF and source-bundle PDF open successfully. Inspect the rendered PDF's layout, diagrams, mathematics and references. A website-only project has no PDF downloads to check. On Windows ARM64, verify the website locally and check both PDFs from the successful GitLab build instead.
Press
Ctrl+Cin the terminal when the browser checks are complete. -
Preview template updates
Template Sync here is a preview, not an installation or an apply. Review its report and leave any available update for the maintenance workflow.
Understand the completed project
The seven documentation stages above describe what you do. Bootstrap groups its 20 activities into seven phases covering preflight, core tools, Git and the host, the project, the build toolchain, the editor, and publication. Use the phase and activity inventory when you need to identify an activity reported by the command.
Know what becomes yours
After creation, the repository is your project. The template manifest
classifies files so a later pdk template-sync can update publishing
infrastructure without taking ownership of your work.
Figure 5.2 separates the project into three practical groups:
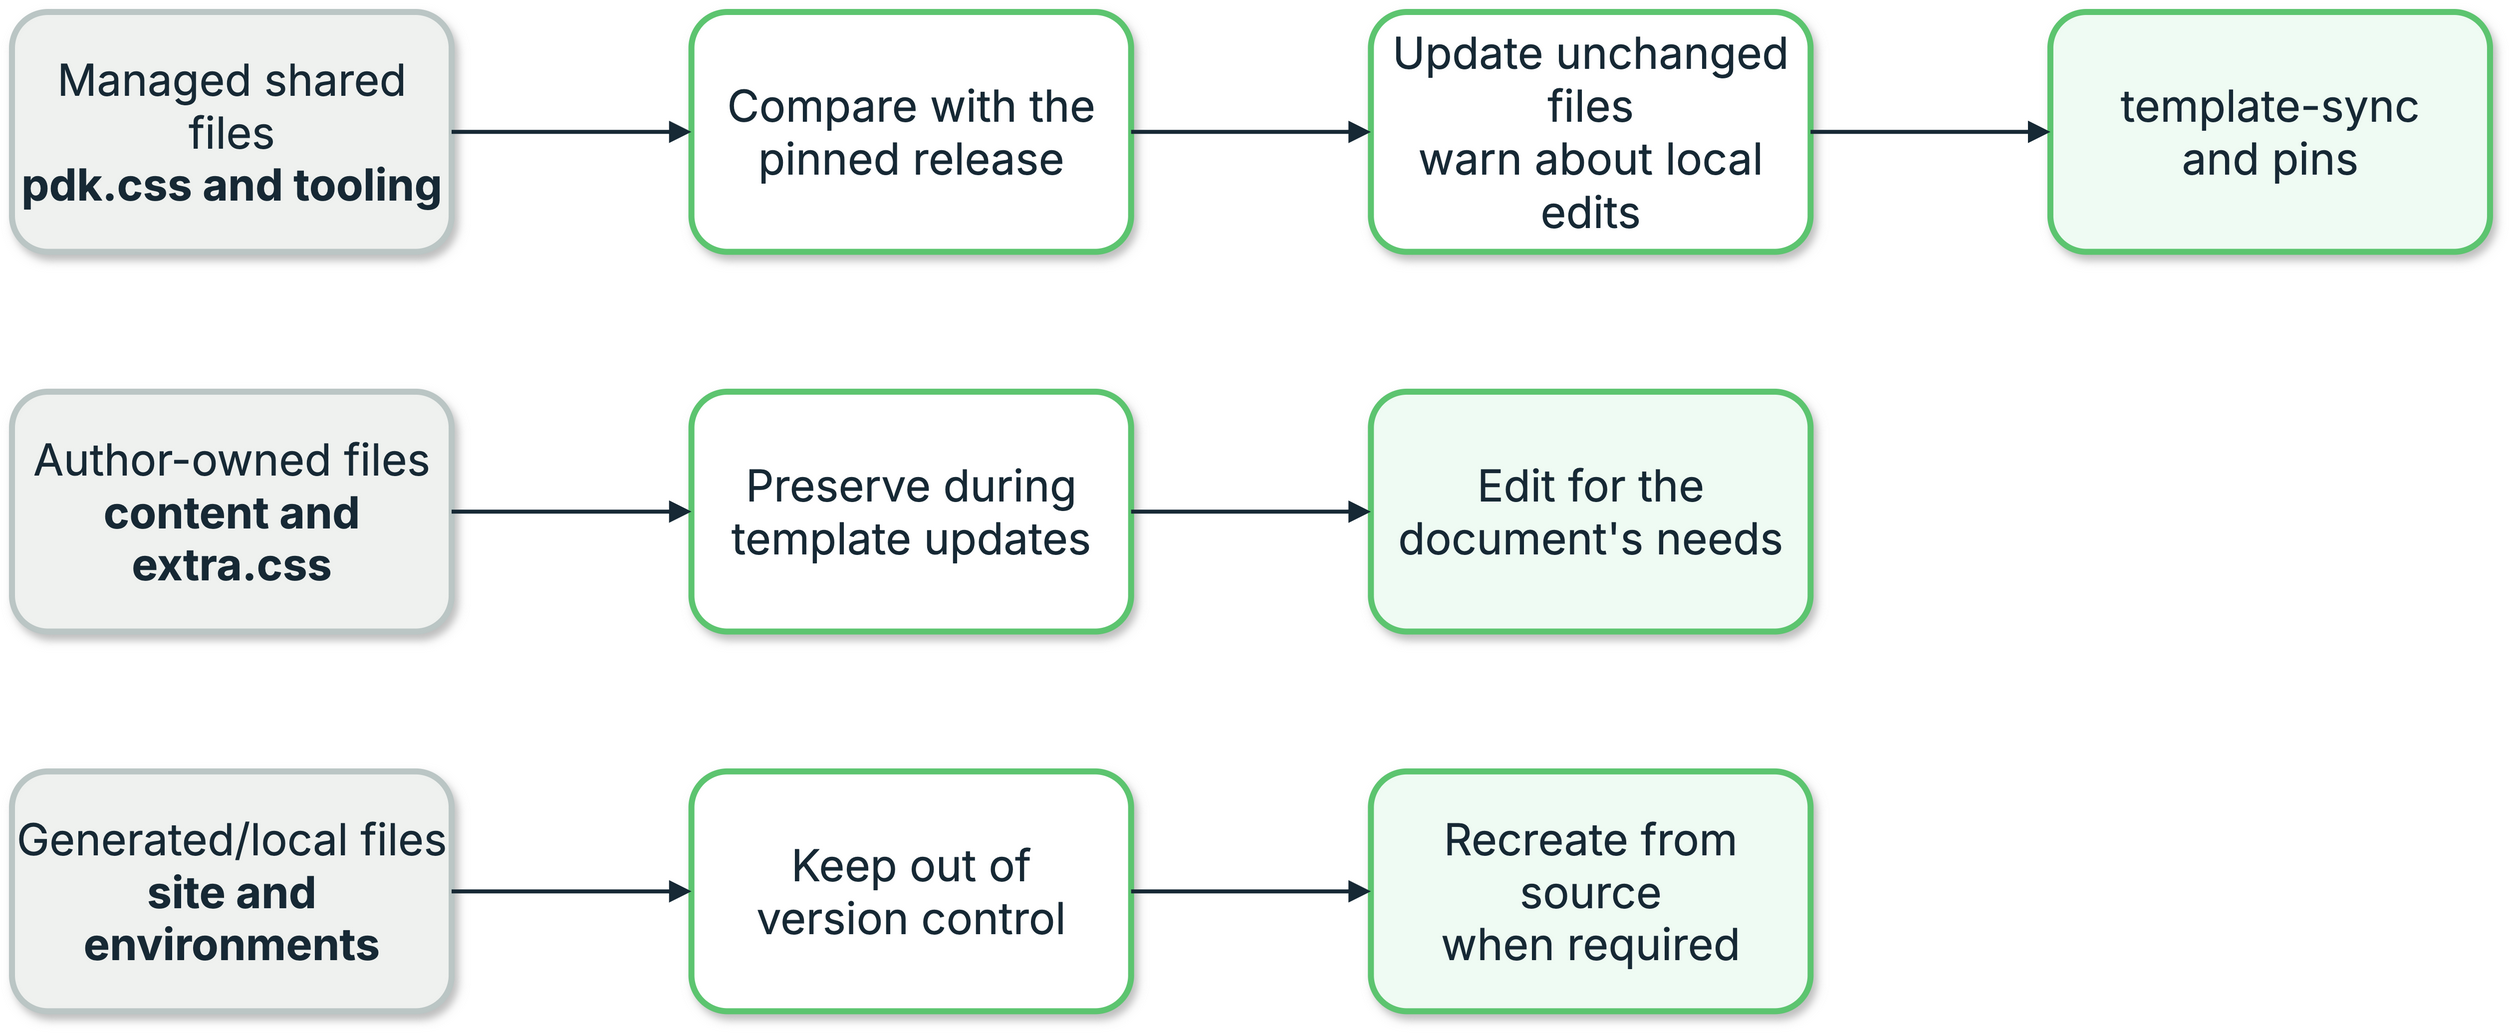
2. Template file ownership
- Template-owned and shared files carry the build, publishing, styles, and common configuration. Review their proposed changes through Template Sync.
- Project-owned files include your Markdown, images, bibliography, and author choices. They remain yours and are not replaced by a template update.
- Generated and local files include build output, caches, and
.venv. Recreate them when needed rather than committing them.
Keep the project current
A generated project does not change automatically when the source template changes. Check periodically and before final publication:
The first run is a preview. If an update is available, follow the Template Sync guide to apply it on a branch, review protected files, and merge it through the normal review process. Template and Prodockit package releases are separate and can change independently.
After Template Sync has finished and the reviewed update is present in the
working copy, activate the project .venv and ask Adopt whether the supported
software or project declarations need aligning:
If Adopt selects any activities, review them and apply the required alignment:
Adopt installs, upgrades, or downgrades the project software to the combination supported by the active Prodockit release. A second dry run is harmless when Template Sync has already performed this alignment; it reports that no work is needed.
Finish with Diagnostics before rebuilding or publishing:
Continue only when the required checks pass. Resolve any failure and review relevant warnings first, then build and inspect both outputs.
Where to go next
Choose the route that matches the result:
- If setup has not completed or any check fails, use Troubleshooting.
- If setup has completed and
pdk diagpasses, continue with Publish a document.