Upgrade existing site
prodockit adopt is for an existing Zensical document, whether or not its
Python working environment has already been established. It prepares that
environment with the exact software combination supported by the installed
Prodockit release, then adds Prodockit's authoring extensions and website
styles without turning the project into a copy of prodockit-template. Adoption
assumes that Git, SSH and the editor you prefer already work. It does not
configure or change any of them.
Figure 5.1 shows the existing project entering the outlined adoption process. Inside that boundary, prodockit assesses the project, adds the standard components, and either installs or skips each optional renderer. The author then builds and reviews the local changes before accepting the updated project.
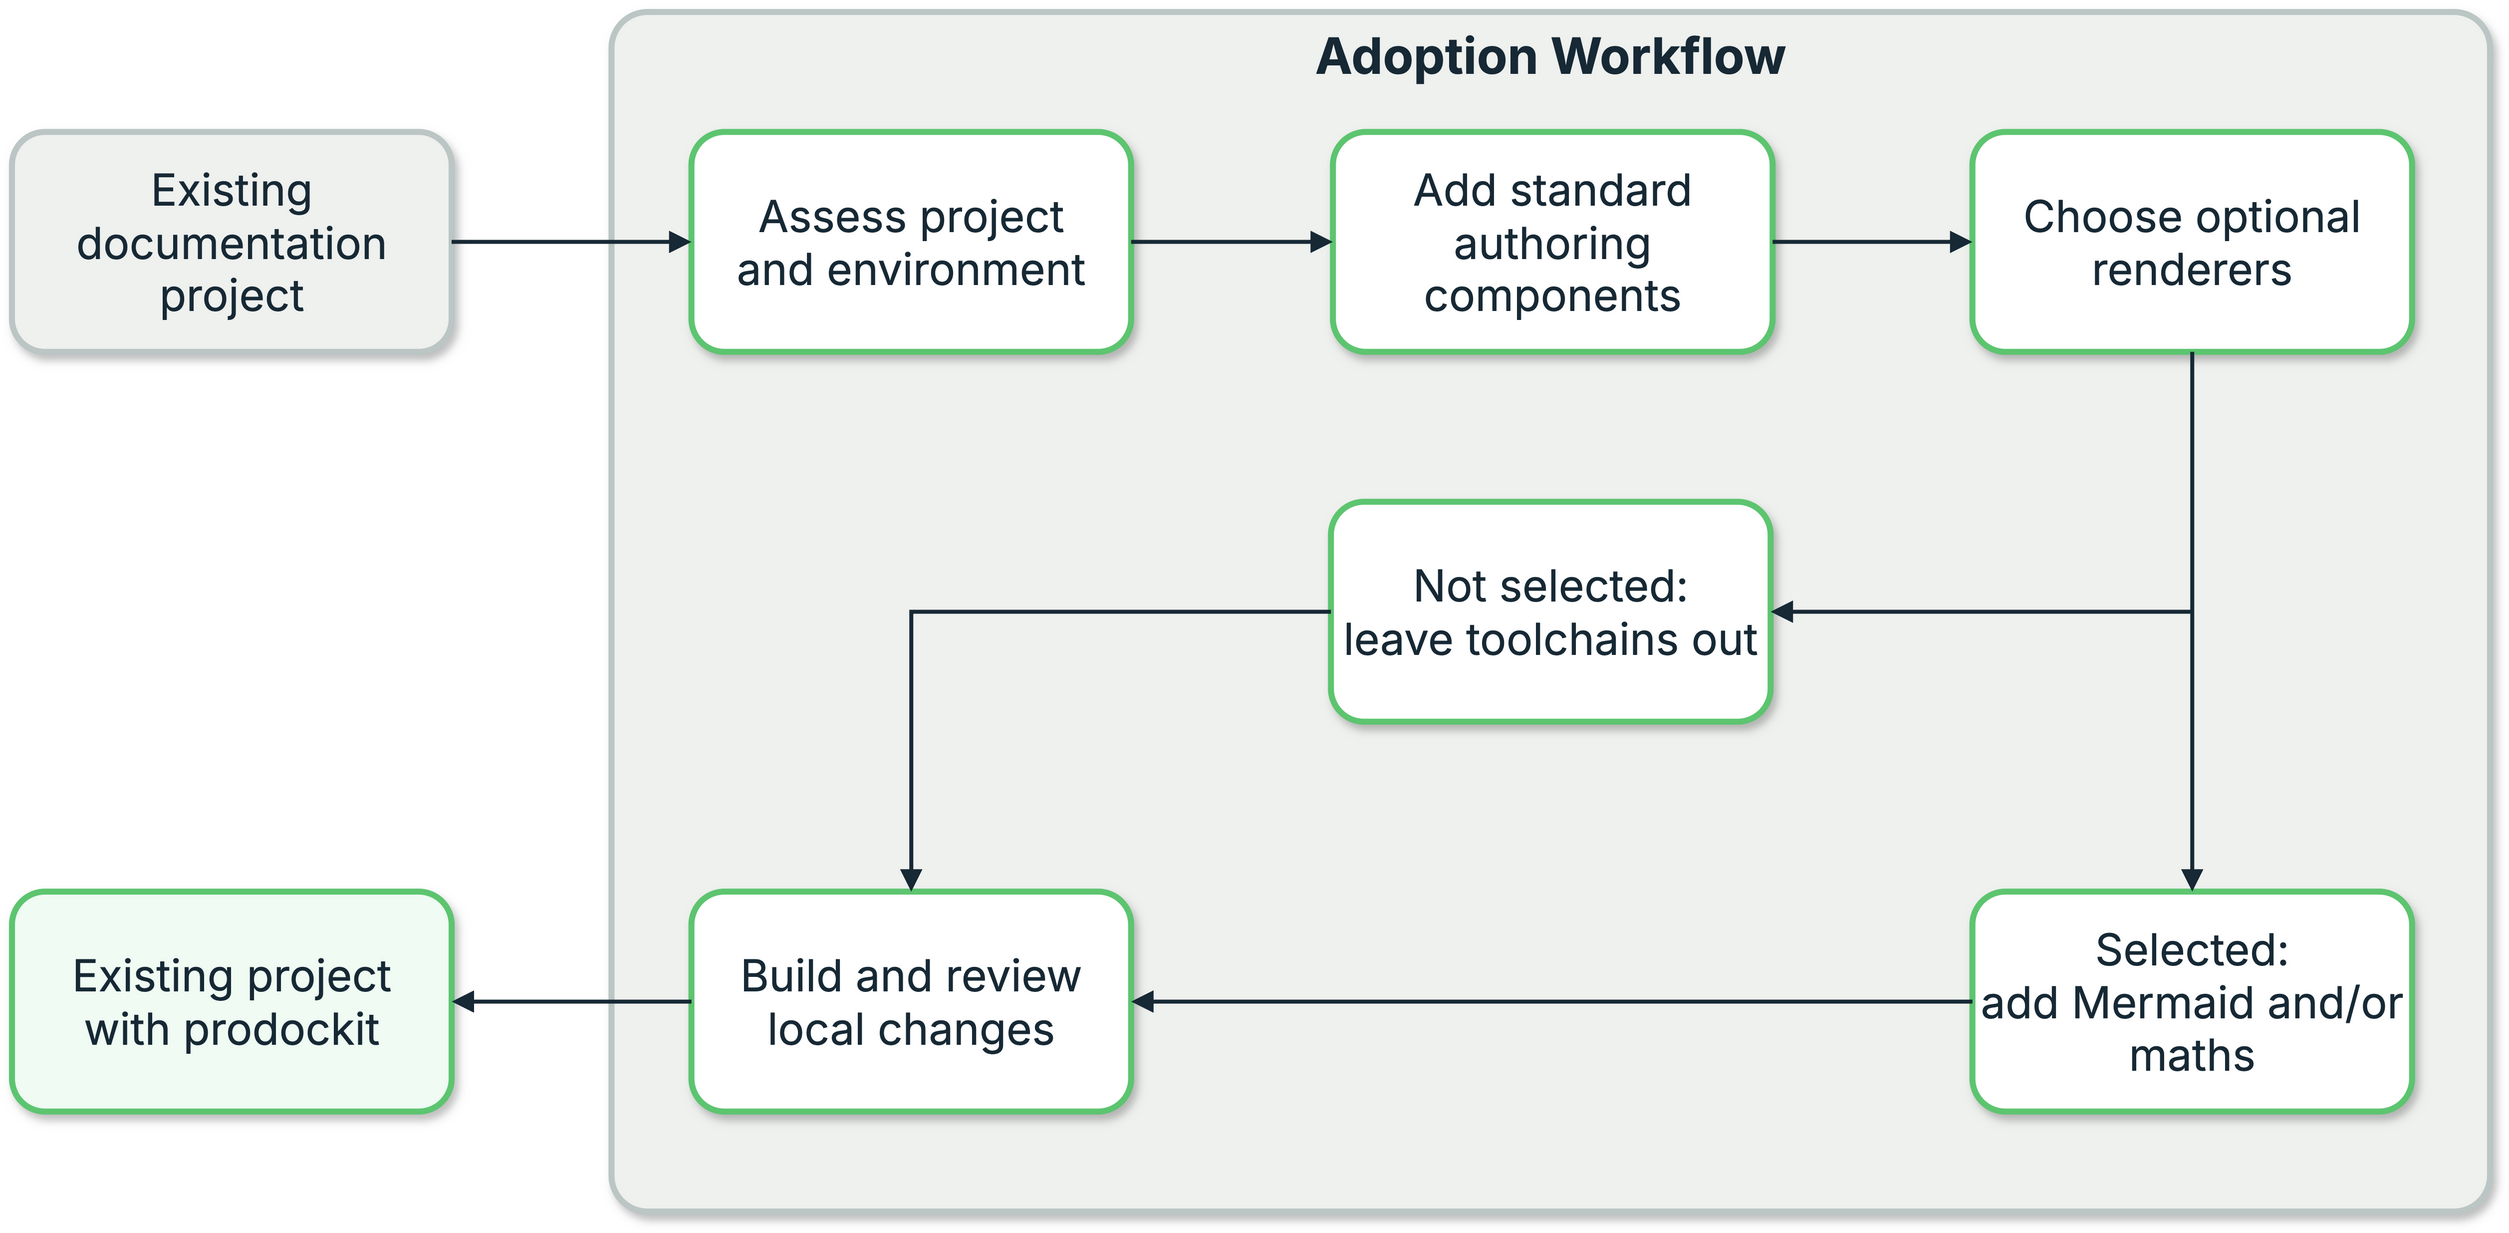
1. Adopting Prodockit into an existing document
What the command changes
The standard installation adds:
- Exact declarations for Zensical, WeasyPrint, Prodockit, Markdown and PyMdown
Extensions to the site's existing requirements file. It uses
requirements.txt,requirements/docs.txtordocs/requirements.txt, in that order, and createsrequirements.txtwhen none exists. An existing operator and extras, such asprodockit[index]>=..., are preserved while its version is aligned; a missing declaration is added with==. .python-versionand.prodockit-toolchain.toml. The latter records every managed version, including Python and Pandoc, from the same tested-version manifest used byprodockit pinsandpdk diag.- The standard prodockit Markdown extensions to the existing
zensical.toml,zensical.ymlorzensical.yaml. - Four standard stylesheets and their cascade in
zensical.toml: managedpdk.cssfollowed by user-managedextra.cssfor the website, then managedpdk-pdf.cssfollowed by user-managedprint.cssfor the PDF. - Managed
pdk.jsfollowed by user-managedextra.js. When mathematics is selected, the generated MathJax configuration and installed vendor bundle sit between those two files. Missing user-managed files are created, but their existing contents are never replaced. .prodockit-components.toml, recording whether this project selected Mermaid diagrams or mathematical notation.- The configured
harvard-cite-them-right.cslcitation style when it is missing. The download is checked as CSL/XML and cached before it is placed in the project. Existing and custom style files remain author-owned.
Existing custom styles can override Prodockit
The Zensical theme loads first. Adoption adds Prodockit's managed
pdk.css after it so Prodockit can supply its component features and
presentation. A template site's template.css remains next when it is
already configured. User-managed extra.css then has the final website
override. For PDF output, pdk-pdf.css follows the website styles and
user-managed print.css has the final PDF override.
If an adopted feature does not look or behave as expected, you may need to remove or revise a conflicting custom rule. Read which stylesheets Prodockit manages and the stylesheet cascade order before deciding what to change.
Mermaid and mathematics are independent options and are off by default. A
document using neither does not need Node.js, MathJax, Mermaid CLI or a browser
renderer. Without .prodockit-components.toml, existing project-local renderer
installations (including incomplete scaffolds) are selected for repair. Zensical's
starter configuration alone does not select a renderer. Run pdk adopt --configure or
use explicit command-line flags to select either renderer. Template projects
ship the component file with both enabled.
When either option is selected, adoption writes the component's package.json
and package-lock.json before installing it. The lockfile records the tested
dependency set, while npm's download cache makes later reinstalls quicker.
Existing tool manifests, lockfiles and helper scripts are backed up before
alignment, including customised copies. Unselected renderers are left alone.
Node.js and npm are machine-level prerequisites rather than project-local
packages. For a selected renderer, Adopt offers a separate runtime activity to
install, upgrade or repair them using the same package-manager routines as
Bootstrap. No Node installation is requested when both renderers are off.
Administrator approval may be required. Offline runs cannot install a missing
runtime. Homebrew on macOS and Windows App Installer (winget) must already
be available from environment preparation.
The command never commits, pushes, changes a remote, or writes editor settings.
For TOML projects, Adoption also reviews new template settings. Unknown options
arrive as commented examples rather than becoming active automatically; branding
and template.css are left out. .prodockit-adopt.toml records which setting
paths have been reviewed. Delete that file to start a fresh review without
overwriting your existing values. Software and health checks still run normally.
See Template settings and the review ledger
for the source, cache, exceptions and reset behaviour.
Adoption installs, upgrades or downgrades the managed Python packages in the active virtual environment and installs the supported Pandoc executable into that environment. It does not replace the Python interpreter that is running it: a different Python minor release blocks the whole stage before packages or project files are changed, and the report gives the exact Bootstrap or virtual environment remediation.
Adoption is not a whole-machine native-library installer. WeasyPrint's Pango, GLib, HarfBuzz and fontconfig libraries, and the document fonts, remain part of the existing machine setup. Follow the adoption row under Prepare the PDF tools before building a PDF.
Adoption stages
Three stages assess the existing project, apply the reviewed integration, and verify the resulting website and local changes.
Stage 1 — Review the existing project
Start with the shared Python preparation, then move into the existing project and assess it before making any changes.
-
Prepare Python and the setup environment
Complete section 3.1 in the parent directory that holds your repositories:
Open section 3.1 to prepare your environment
Return here with that setup environment active. The next step enters the existing project and establishes its separate project environment.
-
Enter the project and prepare its environment
Change into the directory containing the existing project's
zensical.toml,zensical.ymlorzensical.yaml. If the prompt already shows(.venv), rundeactivatefirst so that the parent setup environment is not mistaken for the project environment.If this project already has a
.venv, activate it and runpython --version. Keep it when it reports Python 3.14. If.venvis missing, uses another Python release, or is damaged, deactivate it if necessary and recreate it with the command for your platform:Verify that
python --versionreports Python 3.14 and that the command path is inside this project's.venvbefore installing anything. -
Install or update prodockit
If pip or pip3 does not work
If
pipdoes not work, trypip3; ifpip3does not work, trypip. Keep the intended virtual environment active and check that the alternative command belongs to it before installing packages.Confirm that the command comes from the active project environment:
Adoption later aligns Prodockit and the other managed versions with the combination supported by this installed command. This installation step makes the command available for the first run.
-
Ask for an assessment
The report is read-only. It groups the work into phases and gives every change its own stage, using the same presentation as
prodockit bootstrap. It also says explicitly that Git, SSH, remotes and editors are outside its scope.Figure 5.2 is a short visual guide to the assessment. Use section 28.1, Scan phases and stages for the complete explanation of its phases, stages, colours, and default-No decisions:
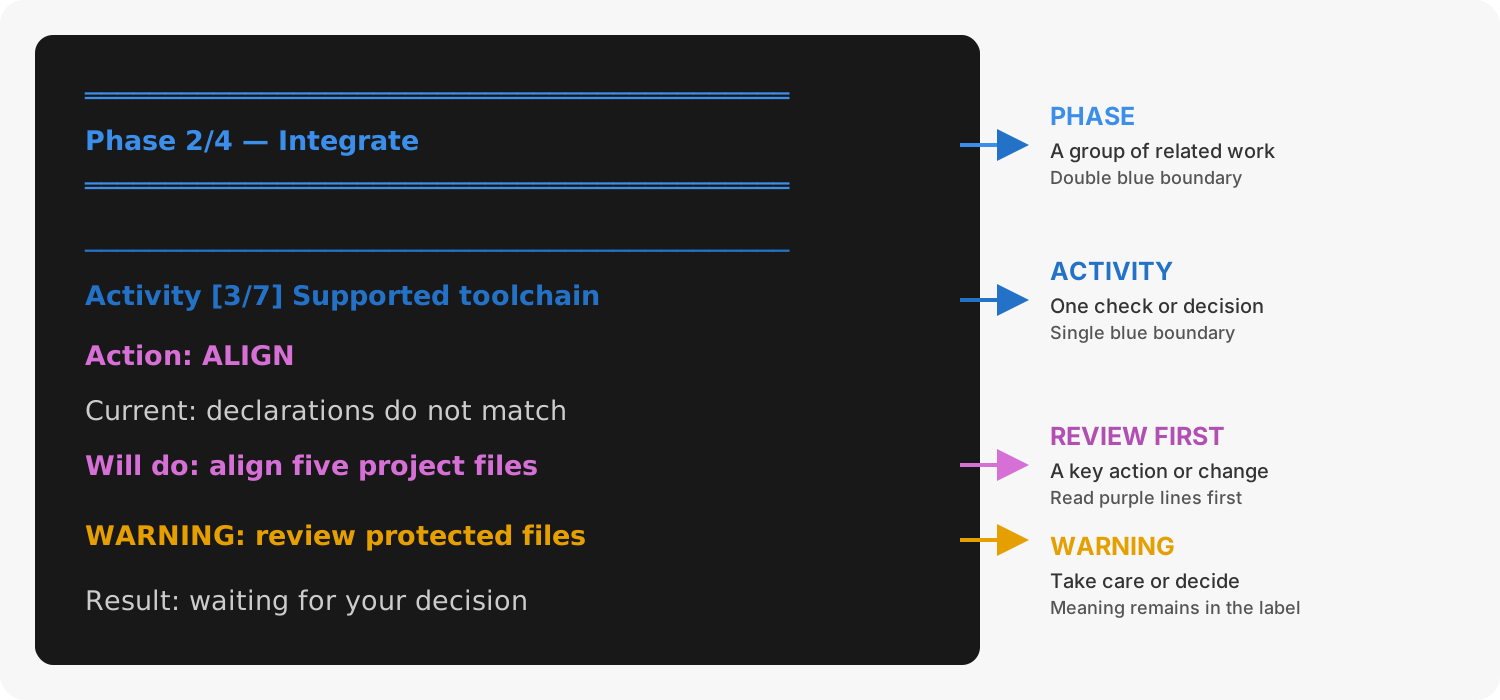
2. Reading an Adopt assessment
-
Choose optional renderers
Keep working in the project directory with its
.venvactive and withpython --versionreporting Python 3.14.Choose Mermaid and mathematics only when the existing document uses them. Run:
The command asks two separate questions:
Does this document contain Mermaid diagrams? [y/N]:
Does this document contain mathematical notation? [y/N]:
Choose Mermaid only when the source contains
mermaidfenced blocks. Choose mathematics only when the document uses TeX notation that MathJax must render. Selecting one does not select the other.The answers are saved in
.prodockit-components.toml, which should be committed with the document so another contributor gets the same components.Command-line flags can select them explicitly for a run:
Stage 2 — Preview and apply
Preview the complete plan before allowing any file or package change. Keep the
project's .venv active throughout these steps.
-
Preview every selected stage
No files or packages are changed. The supported-toolchain stage always lists its affected files and exact commands. Add
--verboseto expose the equivalent detail for the other stages. -
Apply the reviewed stages
The command asks before each stage that writes files or installs software. The toolchain stage says which tools will be installed, upgraded or downgraded, then verifies their versions before writing the matching declarations. A failed installation therefore cannot leave the project claiming a combination that was not reached.
Pip uses its normal wheel cache, five request retries and bounded request timeouts. Set
PDK_PYPI_MIRRORto add an institutional Python package mirror. Pandoc downloads are validated as archives, retained in Prodockit's native download cache and retried before moving from a configuredPDK_PANDOC_MIRRORto the official release source. A rerun reuses any valid cached download rather than fetching it again. The supported Cite Them Right Harvard style follows the same cache-first rule and is written only after its XML and CSL structure have been validated. In offline mode, the report names the exact cache path and canonical URL when no validated copy is available.Routine npm output is captured; a failure is reported with its own error rather than leaving an apparently successful stage. After npm completes, Adoption renders a minimal Mermaid diagram through its browser and converts a minimal expression through MathJax. An incomplete npm extraction or unusable browser therefore keeps both the renderer stage and Ready stage incomplete.
If Mermaid or mathematics is selected, its Node packages are installed below
tools/. These are project-local dependencies, not global software shared with unrelated documents. -
Refresh the project environment
After Apply completes, follow the highlighted environment instructions before running diagnostics or building. This loads any new tool and PDF library paths; it does not recreate the environment.
If Adopt displays its restart banner, fully close Windows Terminal or VS Code, then reopen it. Open PowerShell in the project directory and run:
Use the activation path printed by Adopt if you use a differently named environment. Then verify the project:
Resolve any failures before proceeding to the build stage.
-
Resume an interrupted installation
Skip this step when Apply completed successfully
Use this step only if installation was interrupted or you are continuing in a new terminal.
Change to the project directory and reactivate its environment:
Confirm that
python --versionstill reports Python 3.14, then run the same command again:The stages are idempotent: a satisfied stage is reported as
okand left alone. Adoption reassesses installed versions and files, reuses valid caches, and continues with stages that still need work. It does not remove unrelated requirements or existing Zensical configuration. -
Work from prepared caches when offline
Use offline mode only after putting the exact Python wheels in a directory and retaining a validated Pandoc archive in Prodockit's native download cache. Run the command from the active project environment:
Offline mode passes
--no-indexto pip and does not silently contact PyPI or a Pandoc source. If either cache is incomplete, the stage fails clearly and does not update the declarations.
Stage 3 — Build and review
Build the actual document, then inspect the resulting project changes before accepting them into the repository.
-
Build the website
Keep the project's
.venvactive so the build uses the supported Zensical and Prodockit versions installed by adoption.This uses the document's actual pages and configuration, so it remains the final proof that the adopted components work with the existing project. The YAML filenames are supported inputs, but Zensical requires them to be supplied explicitly with
-f; onlyzensical.tomlis discovered automatically. -
Review the local changes
Commit and publish them through the repository's normal professional workflow. Adoption deliberately stops before either action.
Understand the completed project
This section separates the established project choices retained by Adoption from the files and versions Prodockit can maintain later.
Know what becomes yours
Adoption integrates Prodockit into the existing site without replacing its identity. The adopted project tree identifies the principal files the route adds, but an established project may contain many more author-owned pages, assets, extensions, and workflow files.
Prodockit maintains its standard stylesheets, JavaScript, supported-toolchain record, and selected renderer configuration. Existing content, Git history, remotes, publishing workflow, custom styles, and custom JavaScript remain under author control, as shown in the reviewed diff.
Adoption neither creates nor removes a template relationship. If the existing
project already has valid Template Sync metadata, continue maintaining that
relationship separately; otherwise pdk template-sync does not apply.
Keep the project current
Follow this sequence inside the active project environment:
- Use the platform-specific command earlier in this section to upgrade Prodockit.
- Ask Adopt to compare the existing project with the newly supported combination:
Review the proposed files and activities. If work is selected, apply it:
- Run Diagnostics as the final integration check:
Continue only when the required checks pass. Then rebuild the site and PDF.
Use git diff and git status --short before committing because an existing
project can contain deliberate configuration and design choices that automated
checks cannot judge.
Where to go next
Choose the route that matches the result:
- If setup has not completed or any check fails, use Troubleshooting.
- If setup has completed and
pdk diagpasses, continue with Publish a document.